Showing posts with label life with kids. Show all posts

My daughter's new creative corner


Even during my absence, I have continued to take photos and mentally compose posts, some of which I'm planning to share with you. Today, I would like to show you a new space my four-year-old daughter and I carved out in her room for her to write, draw and dream.

It is here where I can often find her, drawing away. The other day, she and her six-year-old brother took turns sitting at her little desk as they collaborated on a small book they created about a little boy who goes to school. She drew the illustrations and he wrote the story to go with it.


I can honestly say that this lovely corner was my daughter's idea. A few weeks ago, I was all set to rearrange furniture in her room. When I last wrote, I told you that I would be redoing my kids' rooms to reflect the fact that they are older and their interests are changing. Essentially, we are moving away from the toddler stage and into the early school years. Of course, I consulted my kids regarding paint colors, artwork, etc. but thought I knew enough about their tastes and habits to do the major planning on my own. Wrong!


On the morning of the big day of moving furniture around, I handed my daughter the book "Children's Rooms Stockholm" (Jeu de Paume). I was hoping she would find something to inspire a new arrangement in her room and keep her busy as I began taking all the furniture out of her room. Instead, she came running up to me saying, "I like this!" she said, pointing to a picture of a girl's small desk. "Can I have this?"

Hmmm, how to explain that I hadn't planned on buying any new furniture? I was momentarily stumped, wondering if The Big Reorganization of My Daughter's Room had hit a snag. Thankfully, I found a simple solution. Some of you may remember reading here about the small Ikea table/desk that I painted and decoupaged after finding it for five dollars at a thrift store. I originally placed the table in my office as a space for my four-year-old daughter to use when we were both in there, which frankly turned out to be sporadic. Thanks to my daughter's inspired suggestion, this little table has now found a new home in a corner of her room.


After seeing my daughter's new space, my son decided it was time for him to get a new desk. Stay tuned ...

Photobucket

Lucky Kids magazine: Modern kids' rooms

With the kids out of school for the summer, updating their rooms before they return to classes is a priority on my list. I figure summer is a perfect time to make some minor changes that will better reflect new hobbies and interests my kids have acquired as they've gotten a bit older.

I don't plan on making any major changes but I would like to incorporate some minor touches to give the rooms a more modern and cohesive look. I recently happened upon the debut issue of Lucky Kids, Lucky magazine's first issue for kids. The magazine's spread on kid-friendly decor immediately caught my eye for the stylish yet streamlined rooms they featured.


Serene is the first word that comes to mind when I look at the playroom above, though I would not usually associate playrooms with a sense of serenity. OK, so the room doesn't belong to an actual kid. At least the magazine didn't say it did. I should note that the magazine enlisted the talents of prop stylist Kendra Smoot to create the playroom with a woodland theme. As a mother of two young kids, I think the look is a realistic one to emulate. The natural yet bright colors just draw me in and the window shades give the room a wonderfully dreamy look.


The room above has some great imaginative features, so it may not be surprising to learn that it belongs to the son of a fashion designer. Among other things, fashion designer Lela Rose created the colorful quilt on her son's bed out of his favorite childhood T-shirts and used rubber bands to give a new look to a worn Eames chair. The quirky headboard is one I would enjoy having as my own.


Simplicity was the name of the game when it came to designing the nursery above. Architect Elizabeth Roberts told the magazine that the room is a temporary abode for her son until he is old enough to move to a bigger room, a reminder that though we put much thought into our nurseries the time will come soon enough when it's time to make some changes.

One thing I'm definitely looking forward to doing in this latest round of changes to my kids' rooms is involving them a bit more in the process since both of them are old enough to voice preference for decor that goes beyond just color as they did in the past.

Do you have any decorating projects you would like to complete this summer? I'd love to hear about them.

Photobucket

Images: Lucky Kids

Wishing you a productive week

Hello friends,

I'm feeling energized and ready to start a new week after a fun and restful weekend. As I write this, my family room is littered with toys and other kid paraphernalia that I chose not to pick up in order to claim this weekend as my own. On Saturday, hubby graciously volunteered to watch the kids while I took a train to downtown Los Angeles to enjoy a few hours with my best friend in the trendy Larchmont area.


She and I browsed through all the cute shops, where I soaked up the styling inspiration. Library, a clothing shop styled with antique and vintage elements was one that particularly caught my eye. Even the train ride home was relaxing since I had a chance to read through the latest issue of Canadian House and Home.

On Sunday, I had planned to pick up the kids' mess but instead was woken up by hubby who urged me to get out of bed so I could catch a few good garage sales he'd spotted near our house. I had a lovely weekend, indeed, thanks to a great hubby who knows all of my favorite things.

Come Monday, I will be ready to whip the house back into shape and continue work on a few things, including refurbishing a thrift store find and finishing a piece of writing I began on the train ride to Los Angeles. Did you have a good weekend? Do you have any exciting projects you're working on this week?

I hope you have a terrific and productive week.

Hugs,

Photobucket

My Mexican-inspired take on Martha Stewart pom-pom tissue flowers

In honor of the Cinco de Mayo holiday, I'd like to tell you about a project my kids did after attending a piñata-making workshop with a local artisan. Piñatas, usually filled with candy and small toys, are intended for kids to hit with a stick until the piñatas break open and spill the goodies, but I instead decided to hang two tiny piñatas my kids made as decorations for my home office.


Like many of you, I enjoy crafting with my kids, even more so when the craft is something we can use to decorate our home. The craft then becomes a reminder of fun time spent together, while also adding more character and beauty to our home.


The tiny piñatas, which I'm calling my Mexican-inspired take on the Martha Stewart tissue pom-pom flowers, nicely complement a lantern I bought at Chinatown recently and add a nice pop of color to what is perhaps the blandest corner of my home office.

At this point, I should come clean and confess that this project, which is really quite simple, took us several months to complete. We created the newspaper shell soon after going to the piñata-making workshop in February 2010, decorated the piñata in May 2010 and then I let the piñata sit in my office unhung for a whole year! In a burst of inspiration, I hung them up yesterday. My poor kids didn't remember the little balls were piñatas and instead called them "balloons," but were thrilled that I finally hung up their creations.

Here's how you can make your own tiny piñata:

Step 1: Blow up a balloon. Make a homemade paste using about 1/2 cup of flour mixed with about a cup of water.

Step 2: Using a small, thick paintbrush, begin gluing torn strips of paper onto the balloon.

Step 3: Cover the balloon completely except for a small hole at the top that will help you hang it or that you can use to fill up the piñata later. To make sure you've pasted enough newspaper to the balloon, hold the balloon up to the light to make sure you can't see the balloon. The more layers, the stronger the piñata will be.


Step 4: Wait two days or so for the piñata to dry completely. If you are planning to use this for an actual piñata that will be smashed open by kids, you will want to repeat the process of adding more newspaper strips to make it stronger. Otherwise, pop the balloon while holding a piece of it so you can pull it out through the hole.


Step 5: Begin decorating the newspaper ball with tissue paper or any other decor of your choosing. We used tissue paper we had cut up using a circle punch, but the traditional method is to use strips of tissue as I showed you in this post.


You may wish to add more tissue paper to completely cover the newspaper, though my kids were satisfied with doing just one layer. Here are the finished piñatas, hanging in back of my desk in my home office. (Please disregard the messy desk.)


The most time-consuming part is waiting for the newspaper to dry after you've glued it on, but as you can see, the project is simple enough for kids as young as two and four years old, which is how old my kids were when they made these piñatas. It really made me so happy to do this project with my kids since I remember making my own piñatas as a girl though not for Cinco de Mayo. It may surprise you to know that, for all the hype in the United States every May 5, most people in Mexico don't celebrate the holiday at all. You can read a story about this phenomenon that the Christian Science Monitor published today here.

Nevertheless, I think making piñatas is a great project for kids any time of the year, either for a party or for decoration. The piñata can be as simple as a tiny ball like the one we made or as elaborate as your imagination wants it to be.

Photobucket

A New Year: Cherishing the Simple Things

At the start of each new year, I usually like to jot down a long list of goals for the coming year, complete with timelines and tips for keeping myself in check. Truthfully, it is always a bit ambitious. OK, a lot, as I see now from previous lists (ie. my list from many years ago included learning Latin (!!!). This year, I am keeping my list a lot shorter and realistic, but with one main difference. In the coming year, I actually want to do less and enjoy it.


The photo you see above is of my kids during our walk home from school each weekday. Each and every time, my daughter walks with her arms outstretched, as she skips, runs or even dances down the street, feeling the fresh air and noticing the subtle changes in the seasons here in Southern California.


She always finds a memento to take home with her. A flower, a leaf or even a twig. Even if she just picks a weed, I never tell her not to take it home. I figure that if she has found beauty in that piece of nature, who am I to tell her otherwise?


She is always thrilled with whatever she finds.


It really makes my heart sing to see her be so content with such simple things.


These photos are my reminder to do as my daughter does each day on this short walk.


To find joy in the everyday, simple things. To slow down and enjoy the process of whatever we are doing, not just the end product. And, most importantly, to cherish the time when we're not doing much of anything at all.

Happy New Year, my friends. Please know that I appreciate each visit and especially each comment you make on my blog. Here's to a happy and healthy 2011 for all of you.

Hugs,

Photobucket

Getting a little dirty for the sake of color

We got our hands a little dirty today. This is standard fare for my kids, but not for me, at least not when it involves dealing with tiny insects and toiling in the hot sun. This explains why our backyard is all lawn and not much else.


What prompted me to dig out my gardening gloves and other tools are three colorful rose plants I couldn't help but notice in the produce section while doing my weekly grocery shopping. Bright pink, tangerine and ivory. I simply couldn't resist these beautiful flowers, especially when they all cost less than what I would pay for a bouquet of roses.


As my kids and I dug the holes for the plants, I looked around at all the brown dirt surrounding us. I felt slightly sad knowing we've lived in our house for more than five years without adding much color to our landscaping. We bought our house new, which meant we were responsible for all the backyard landscaping. Drainage pipes, lawn, retaining wall. All of it.

The landscaping company we chose designed a backyard that earned us plenty of compliments early on, though I'm sure many of our visitors have since wondered why we've never taken it to the next level by adding more plants and flowers. There are many reasons why we didn't do so, but the truth of the matter is that my priority was working on the inside of our home.


Until now, I've been content to let my husband mow the lawn and do the weeding. The last time I planted anything in our backyard was last December when I discovered pink poinsettias at Target. It was a memorable occasion because it was the first time both my kids were old enough to help me with the gardening. Today, my son proudly noted how large the poinsettias have grown, prompting me to fantasize that our tiny rose plants would one day grow to towering bushes. This thought then led me a bigger dream: that one day our backyard will be a panoply of color, thanks to all the plants that my kids and I will plant together in the coming years.


Sometimes I've regretted not forking over the extra cash early on for professional gardeners to make our backyard look pretty, but I'm now thinking maybe it was for the best. A little corny perhaps, but wouldn't our garden be that much more precious if my kids and I are able to look on it one day as the result of our laboring together?

Truthfully, I don't know whether my children's interest in gardening will hold. Even now, they are content to help me dig for a few minutes, but then abandon their posts to go make "sand castles" with the dirt and bury all their dinosaurs.


The fact of the matter is that I've managed to plant three different plants in five years so I've got to be realistic if this plan is going to work.


The way I see it, I'll just take it one plant at a time.

Photobucket

A sweet little reading nook

It's not as if my kids don't have anywhere to sit down and read a book. I mean, kids will sit anywhere. In the aisle of a toy store. My closet. The bathroom floor. You get the drift.

But when you want them to love reading, I think it's important to create a special place for them to sit comfortably with a book. It was in that spirit that we created a sweet little reading nook last week.


Previously, the carpeted area stood empty, a sunny place for us to do puzzles or play with Legos.


As you can see, my kids' new reading nook is right below the new little art wall I just wrote about here. Actually, it was the new art that inspired me to create this little reading spot for my kids. They enjoyed looking at the colorful new artwork so much that they wanted to put the paintings in their rooms. Instead, I proposed keeping these paintings in the family room to designate their own corner of the room for reading or whatever they feel like doing.

The best part is that I didn't go out and buy anything. The wicker chair had been looking for a good home after I bought it at a thrift store a couple of months ago for $3; the Anthropologie rug (a steal on Ebay a couple years ago) was moved over from another area of our house; the basket holding the books cost 35 cents at another thrift store; and the Bla Bla pillow pal has always been in my daughter's room, usually on her bed. Somehow, everything came together as if each piece had somehow been destined for this spot all along.

(By the way, please ignore those yucky looking child-proofing foam pads on the table in front of the window, but we've had a ridiculous amount of eye injuries from kids running into tables. And no, not while reading books!)


I am blessed with children who do seem to love reading as much as I do so they immediately began using their little nook.


They don't always sit in the little chair, but I'm thinking that merely having a chair there is like an invitation to slow down, pause and grab a book.


Really, it's quite simple to create a reading nook. All it takes is a little chair (or something soft to rest on as shown here) and a container for books. The rest of decorative touches are optional, but certainly do make the reading nook more inviting and cozy.


Remember, to see more reading nooks, click on the "kids' nooks" tab on the upper right or just click here.

Photobucket

Handmade party treat bags for kids

Yummy-looking heart crayons ...


... plus tiny dinosaurs ...


... in handmade paper sacks = party treats for the preschooler set.

Now, I know dinosaurs and hearts don't usually go together, but in this case I needed a couple things that would appeal to both girls and boys in my son's preschool class.

First, I asked my four-year-old son whether he would help me make the party sacks. I wasn't sure how we would make them, but it had to be something he could do and I didn't want to use tape (too messy and ugly) or staples (too dangerous for little kids). We settled on pink and lime green rice paper (I had lots left over from my wedding!), which we then "hand-stitched" together using contrasting ribbon.


It took us a few sessions to finish 30 bags, but my son was so enthusiastic about the project that he never complained. He just really loved the idea of giving his school friends something he had made.

Then, it was my turn to do a little project I had been wanting to do for a while.


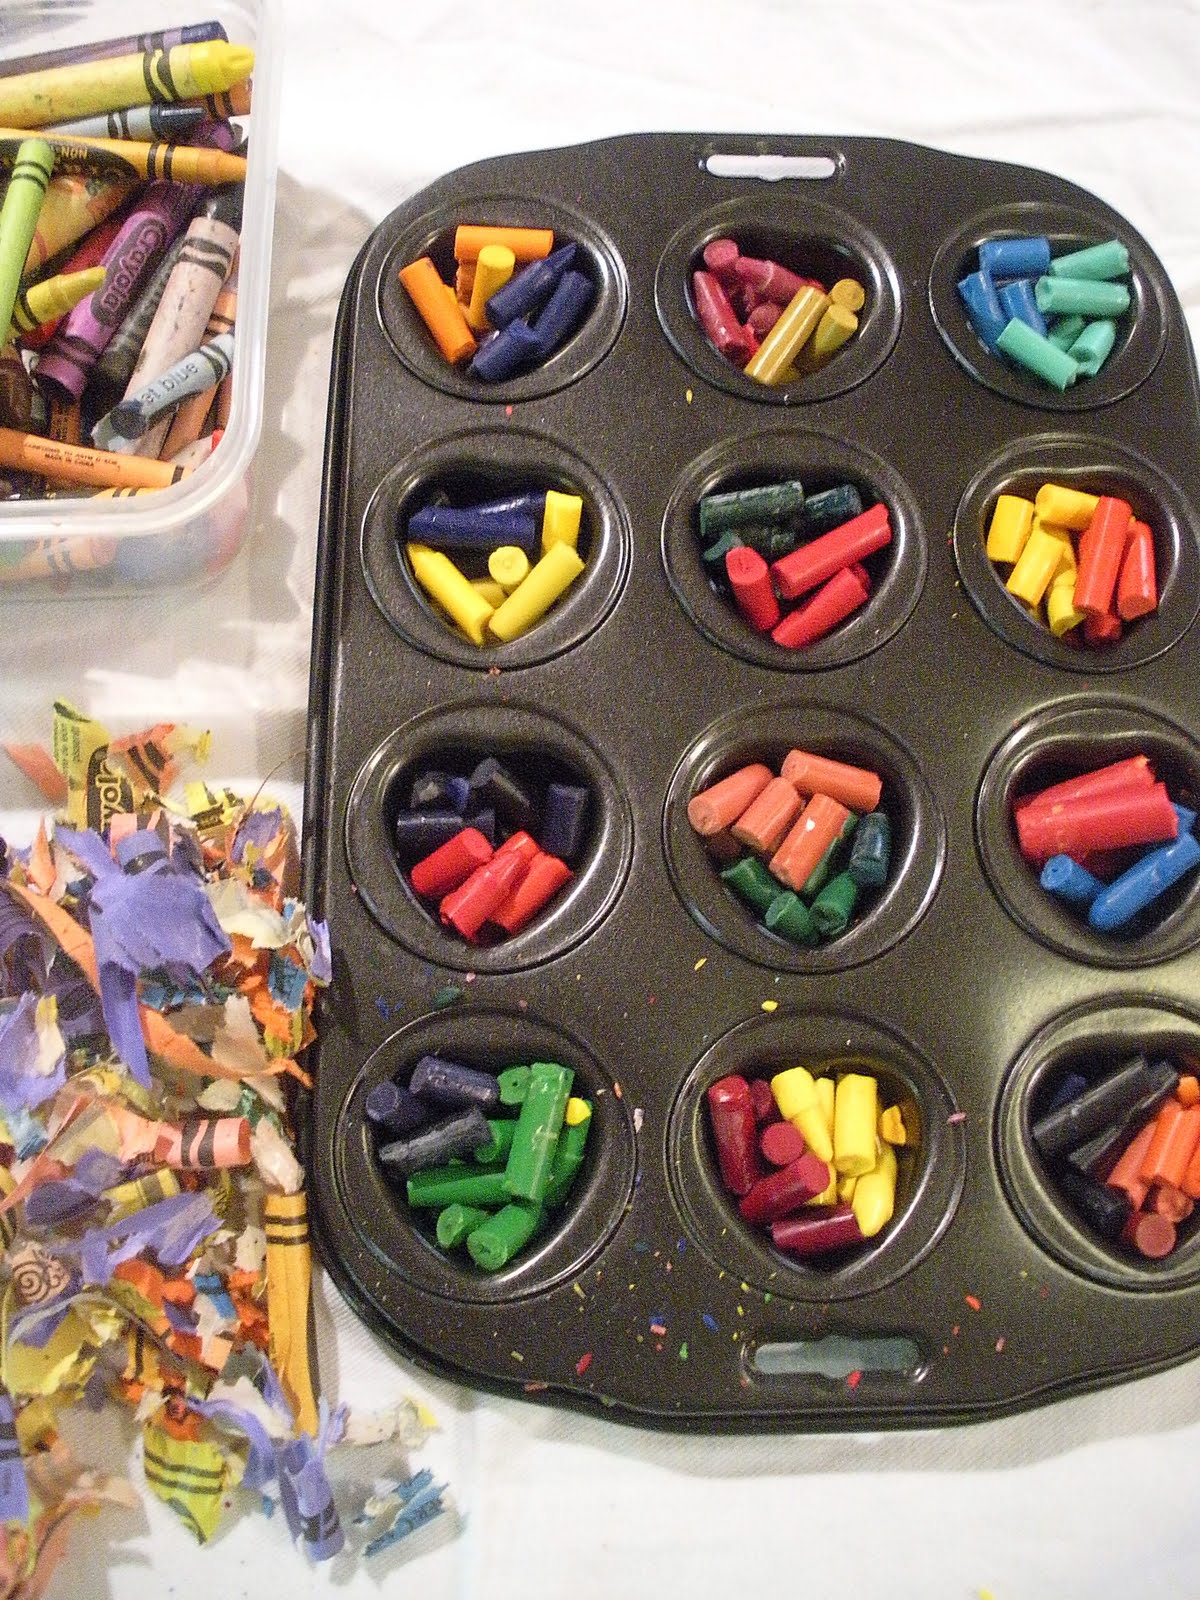
For months, I have been waiting patiently for just the right occasion to make melted crayons. I'm not sure what the appeal was, but I have always loved crayons, even the smell. I've seen these melted crayons many times in round muffin shapes, but really wanted to make them in this heart-shaped pan I had found for 99 cents at the thrift store.


The hardest part was peeling off the paper wrappers. Sometimes, they would slide right off the crayons, but other times, I found myself struggling, wondering why I ever got myself into such a mess. It did feel good, however, to put to use all the broken bits of crayons I'd been saving.


I decided to stick with two colors for each crayon so that the kids could have two colors on each crayon and, well, because I thought they looked prettier. Think of what happens when you blend too many colors while painting. The colors turn muddy brown. I sure didn't want that to happen to these crayons.


Yum! Don't they look like candy? I guess I can't blame my two-year-old daughter for wanting to eat them. Here's my son handing out the bags during the party at his school:


Each bag had a tiny dinosaur, a crayon and a page of dinosaurs for them to color. I had originally wanted also to include a copy of a dinosaur poem, but couldn't find the book at the last minute.


Yaay! My daughter actually did some coloring with these heart crayons, not just try to put them in her mouth.


She actually began using the crayons right after the party and, since then, often pulls them out just to look at them, as though they are her little treasures.


Photobucket