Showing posts with label learning. Show all posts

Handmade party treat bags for kids

Yummy-looking heart crayons ...


... plus tiny dinosaurs ...


... in handmade paper sacks = party treats for the preschooler set.

Now, I know dinosaurs and hearts don't usually go together, but in this case I needed a couple things that would appeal to both girls and boys in my son's preschool class.

First, I asked my four-year-old son whether he would help me make the party sacks. I wasn't sure how we would make them, but it had to be something he could do and I didn't want to use tape (too messy and ugly) or staples (too dangerous for little kids). We settled on pink and lime green rice paper (I had lots left over from my wedding!), which we then "hand-stitched" together using contrasting ribbon.


It took us a few sessions to finish 30 bags, but my son was so enthusiastic about the project that he never complained. He just really loved the idea of giving his school friends something he had made.

Then, it was my turn to do a little project I had been wanting to do for a while.


For months, I have been waiting patiently for just the right occasion to make melted crayons. I'm not sure what the appeal was, but I have always loved crayons, even the smell. I've seen these melted crayons many times in round muffin shapes, but really wanted to make them in this heart-shaped pan I had found for 99 cents at the thrift store.
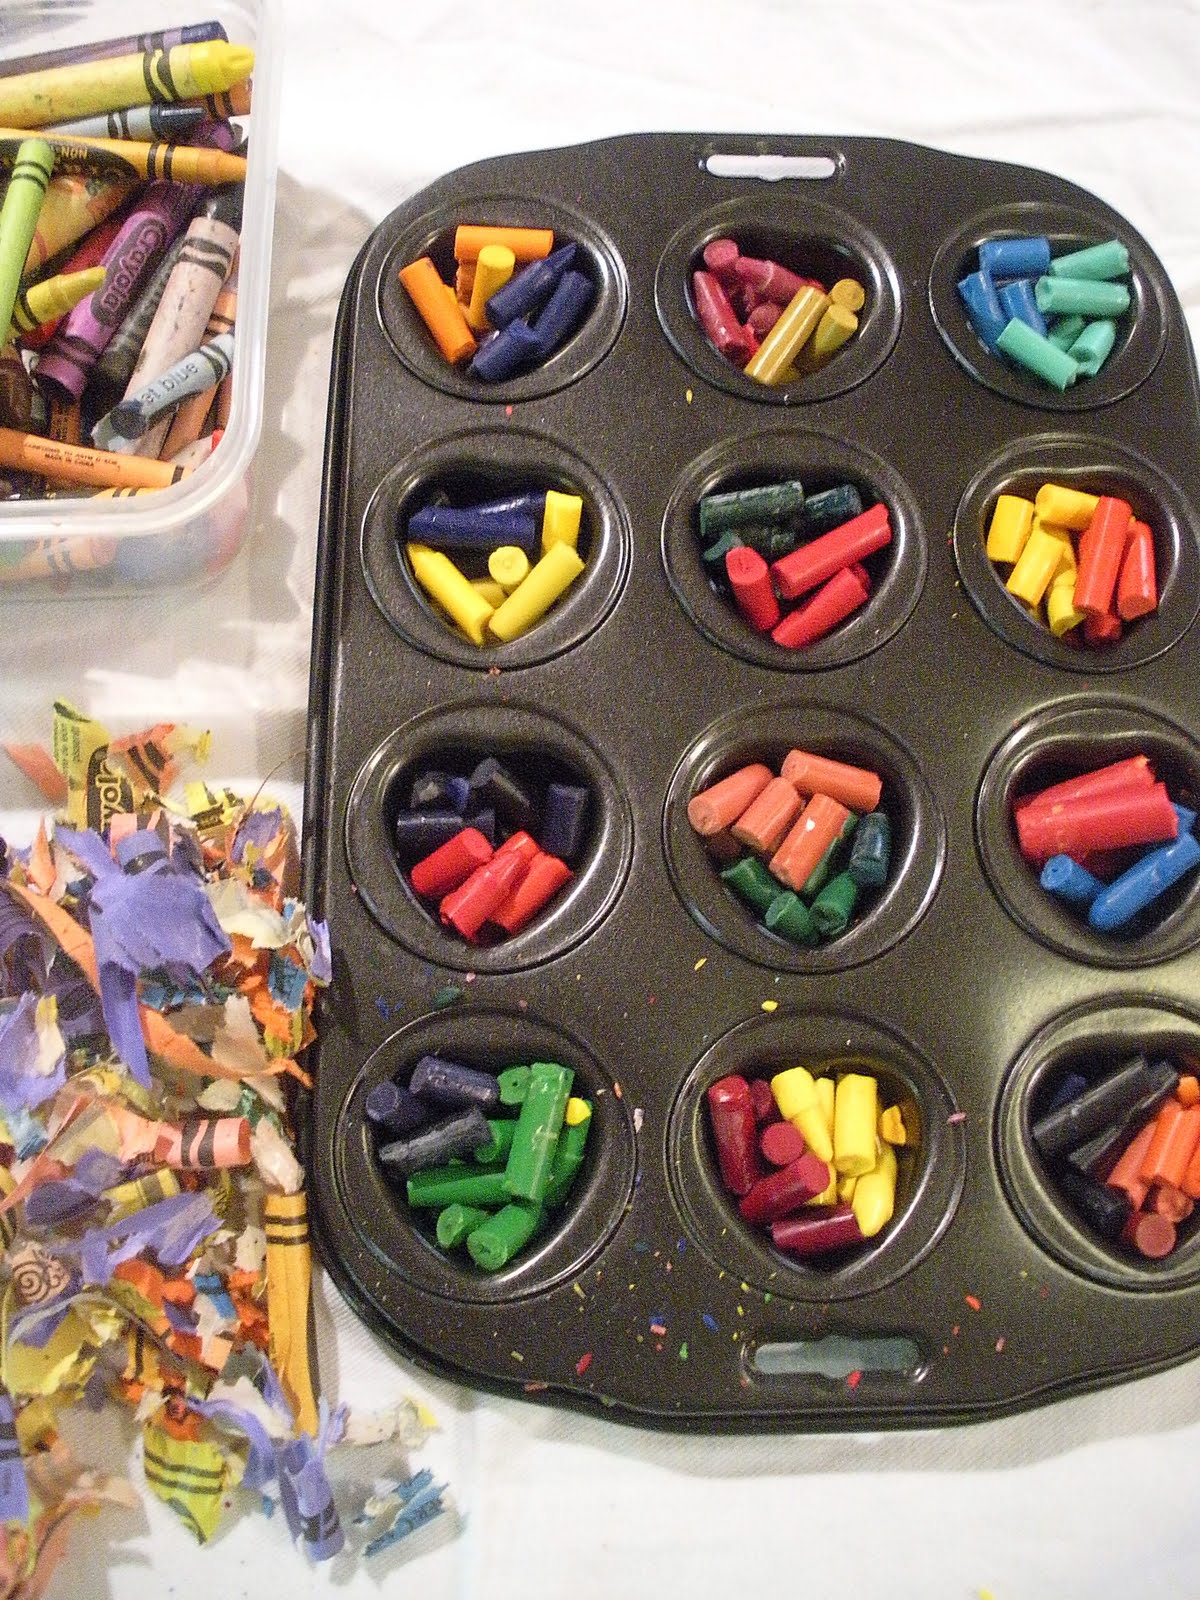


The hardest part was peeling off the paper wrappers. Sometimes, they would slide right off the crayons, but other times, I found myself struggling, wondering why I ever got myself into such a mess. It did feel good, however, to put to use all the broken bits of crayons I'd been saving.


I decided to stick with two colors for each crayon so that the kids could have two colors on each crayon and, well, because I thought they looked prettier. Think of what happens when you blend too many colors while painting. The colors turn muddy brown. I sure didn't want that to happen to these crayons.


Yum! Don't they look like candy? I guess I can't blame my two-year-old daughter for wanting to eat them. Here's my son handing out the bags during the party at his school:


Each bag had a tiny dinosaur, a crayon and a page of dinosaurs for them to color. I had originally wanted also to include a copy of a dinosaur poem, but couldn't find the book at the last minute.


Yaay! My daughter actually did some coloring with these heart crayons, not just try to put them in her mouth.


She actually began using the crayons right after the party and, since then, often pulls them out just to look at them, as though they are her little treasures.


Photobucket

Decorating with vintage game pieces

A private joy for me as a mom has been enjoying all the fun stuff that makes its way into our home these days.


One of the thrift stores I frequent has awesome vintage educational games every once in a while that I pick up for my kids for mere cents. Without trying, I've amassed such a nice collection of vintage educational puzzles that thrift store clerks often ask whether I'm a teacher.

Several months ago, I picked up several boxes of the puzzles shown above, all with different themes and puzzle formations, for only 55 cents each (a price sticker on each box says they originally retailed for $1.50).


A clear bonus of these Japanese-made puzzles has been the fun and colorful graphics on them that depict animals, people and common objects. My kids enjy putting these puzzles together because they love the graphics so much, too.


Today, I picked up three educational board games, the highest at a cost of three dollars. When I took some of the board pieces out of one box, I was a little surprised that they were so colorful since they had been in rather plain boxes sealed with tape.


I was having such a good time just enjoying the graphics when it occurred to me for the first time that some of these puzzle pieces could be framed and turned into artwork for my son's room.

I just love the clean and vibrant detailing on many of these pieces from the 1972 board game. Let's take a closer look:


For a more uncluttered look, I could even pick some of the smaller square pieces and frame them in a grouping of four. Really, I'm not sure, but I'm just so in love with these adorable and modern-looking graphics. Feel free to offer up any ideas for ways to display these. The Australian mom who writes the blog, Thrifted Treasure, wrote a post a few weeks ago about some of her awesome game boards she found while thrifting. I'm on the lookout for a future post including photos of the room she puts them in.


In the same box of the numbers game was another color combination of aqua, red and black. Again, it's quite a simple look but these would lend an uncluttered look on the walls of a room that tends to get quite busy with toys, books and the occasional mound of clothes.


I should mention that these games are in excellent like-new condition. Well, before my kids got to them!


Here's another alphabet puzzle that would have been a good one to frame for my daughter's room because it was a present from the kids' great-grandmother, who used to work at a kids' nursery school years ago. Unfortunately, it is missing three letters so we just play with it.


I do have one Mary Poppins game board on the wall in my daughter's reading nook. It is colorful and contains many of the colors in my daughter's room, where our family congregates at night to read books. You can see the game board in the photograph below, to the left of my son.


Now, here's the dilemma. My kids and I actually play with these puzzles a fair amount, given our unofficial ban on TV. Just today, as I was photographing the games, my kids were happily playing with the puzzles and protested when I took them so I could arrange them for the photographs.

Should we continue playing with all of them and I start looking for artwork elsewhere, or should we choose a few nice-looking ones to frame? What would you do?

Photobucket

Valentine's Day crafting and inspiration

When it comes to crafting, my two young kids love anything where they can get their hands dirty, but I don't know of too many Valentine's Day crafts where we can do that. Fortunately, I found a way around this dilemma. We did get quite dirty with the paint but still managed to produce a wreath that my kids proudly hung up in our home.


I found the wreath form at the thrift store for a $1 a couple weeks ago fully intending to use it for a crafting activity with the kids. I was thrilled when I found an idea for wreath crafting over at Bloesem Kids and hopped right on over to the Little Pinwheel blog for directions, which basically required that the kids dip their hands in paint and produce several hand prints.


No problem, just put hand gently in paint.


Yaay! That was fun!

The kids were having so much fun that I realized they wouldn't be content with just producing a few handprints. I pulled out some large pieces of white paper and told them, "Just go to town. Do whatever you want with the paint." They had fun wiping their hands all over the paper, producing swirls and masses of paint.


Papa was gone during the hand painting so, in lieu of that, my son simply traced his hand for a hand silhouette we planned to put on the wreath.

As it turned out, our hand print wreath did not look as nice as the one on the Little Pinwheels blog, so I decided to try something else. With the kids' permission to cut up their artwork, I pulled out a heart paper cutter that I've had for a few years and cut out several hearts from their paintings.

I really liked how many of the hearts had a velvety texture to them.


The kids' favorite part was gluing the hearts to the wreath. This actually took them at least 30 minutes, but they were surprisingly enthusiastic the whole time.


My favorite part is that they worked well together during the whole process, with minimal instruction or interference from me.


We had so much fun that I've got my eye on a couple other Valentine's Day crafts. I would like to make this mobile that originally appeared in Wondertime. This "lovemobile" has the words "I love when we ... " on the top part and each of the different things you enjoy about that person written on each heart on the lower part of the mobile. You can find instructions here.


This love hanger caught my eye for its simplicity and ease of crafting since you could make something like this with items that you already have around your house. Find instructions here.

I'm fantasizing about making some of these lavender-filled heart sachets for some special people in our lives. You can find directions for these cards here.


Or how about these simple but pretty tissue flowers? Find the instructions here.

If you find yourself terribly short on time, yet pining for a little Valentine's Day decorating, then why not grab a few items around the house that evoke that touch and place them someplace where you can see them everyday?

Here's what I did on a recent morning with some favorite red and pink items:

One of my favorite kids' books, my daughter's baby shoes, her baptismal thank you card and a set of letter stencils.

Notebook bought while on my honeymoon in Paris.

Tiny red books, miniature hourglass and an origami paper box that holds my memory sticks and other small paraphernalia on my desk.

I'd love to know if you do anything special to add a Valentine's Day touch to your decor, or if you have any ideas for easy Valentine's Day crafts.

Photobucket

The sounds of poetry in our home

One of the most well-thumbed books in our house these days is one I never would have guessed would entertain my kids so well even when I bought the book a few weeks ago.


Seeing the illustration of the little girl dressed up as a bumblebee inspired my daughter to go find her bee antenna.

"Poetry Speaks to Children" and its accompanying CD has become a favorite request at our kitchen table for one simple reason. My kids (ages two and four) love listening to the various forms of storytelling on the CD. With 34 poets reading their work, there are plenty of different voices and stories to catch my kids' interest.


My kids are always most receptive to sitting still while it's still early in the morning.

I first bought the book at a thrift store for five dollars, which I considered a bargain since the book and CD looked brand new. I figured I might end up listening to it by myself since most days I can barely get my kids to sit still long enough to finish a meal.

But I have found that if I bring poetry out of the books, my kids will sit and listen, at least for a few minutes and sometimes even longer. Some of you may remember how my kids and I packed our "poetry in a suitcase" last spring, an idea we got from children's author Janet S. Wong (who I interviewed here and who reads a poem in "Poetry Speaks to Children.")


Our poetry suitcase, which we decoupaged on the outside with my kids' artwork and on the inside with Eric Carle artwork from ads for the Los Angeles Times Book Festival.

We continue to take out our suitcase every once in a while but, frankly, we were ready for a fresh approach to our poetry reading, especially since my kids are so young and are always interested in the newest toy in the house.


My kids, "reading" the poetry book together

"Poetry Speaks to Children" is an entertaining read with wonderful illustrations and the CD makes the words come alive as each poet's voice fills our home with a wide range of poetry, everything from Maxine Kumin's "Sneeze" to "My Sister Saw a Dinosaur" by children's poet laureate Mary Ann Hoberman to "Stopping by the Woods on a Snowy Evening" by Robert Frost.
You can imagine my surprise one recent morning when, still wiping the sleep from my eyes, my son ran up to me with poetry book in hand and said, "I want to listen to this, mama!"

"Huh?" was my less-than-eloquent answer as I realized that drinking coffee was going to have to wait a few minutes that morning. "OK."

Who would've known that my kids would one day be more enthusiastic about poetry than I?

Photobucket

Using clay to create a festive Fourth

It's about time I fess up to yet another aspect of my book addiction (believe me, there's lots more to this aspect of my life). Over the past year, I've amassed a nice collection of old children's craft books, from the 1960s to the 1980s.


Anytime we're feeling crafty, we go through these books, all thrifted finds or from sales at the public library. For our latest activity, we consulted "Things to Make" by Peggy R. Greene, published in 1978.

Clay Play helped us produce the star garland (pictured above), which was perfect for the Fourth of July holiday. The activity caught my eye because it looked like fun and a great way to introduce my daughter, now two years old, to some basic cooking concepts using simple ingredients.

First, we assembled our ingredients to make the clay as instructed:
4 cups of unsifted flour, 1 cup of salt and 1 1/2 cups of cold water

This recipe makes a LOT of dough so you may want to halve it, instead of having to pull out all the cookie cutters you own, like we ended up doing.


Yes, that is my daughter licking the countertop, which I clean frequently for this very reason. Unfortunately, she is not yet past the stage of putting things in her mouth yet though I never would've guessed that the countertop would pose this kind of temptation.


Both my kids enjoyed putting the ingredients together.

I

I kneaded the dough for them and then instructed them to use their play rolling pins to flatten the dough. My daughter did not quite master the skill on the first try, but no worries since her brother was clearly in full concentration mode.


This part she liked.


I know now who to call on at Christmastime baking sessions.


As I said, we had PLENTY of dough and we just kept rolling and cutting until we had finished our dough. We then baked it for one hour at 325 degrees, waited a day for it to cool completely and then painted the pieces.


I like these trays, which I bought at the 99 Cent store, for painting. I find them more practical and less wasteful than the traditional paint cups, which invariably end up with paint in them after my kids get done painting.


Here is the finished product, hanging festively above their little table in the kitchen where they play often. Truthfully, I thought we were just going to make simple hand prints when we first started, but we made so much dough that we took out our cookie cutters.

I had three different sizes of star cutters so I decided this would make a festive garland for the Fourth of July holiday. After the holiday, we'll probably switch the garland with other pieces we made with other cookie cutters, but for now, my kids are enjoying their handiwork. They loved making something to adorn their little kitchen area and we had a great time together.

Photobucket