Magazine files: The ultimate family home

Today, I found inspiration in the pages of ReadyMade magazine. I'm not about to get out my power tools or embark on any hardcore DIY projects, but I do appreciate the magazine's can-do aesthetic, especially when it features a great home belonging to a family in South Africa.


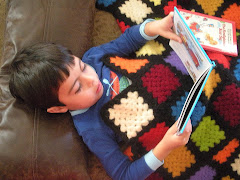
Check out the toys crammed in the corner next to the door in the photo above. I love this room for the way all the seemingly disparate items come together in such a well-composed manner. So often, I see interiors magazines featuring family homes showing cute, smiling children but only one toy in the entire photographic spread. Of course, few of us go to interiors magazines to see messy houses strewn with toys but many of us are looking for ideas on ways to incorporate our kids' belongings (all of them, not just one toy) into our decor.


The home belonging to Morné and Kerryn Fischer, shown in the June/July 2010 issue of ReadyMade magazine, immediately caught my eye because it provides so many great examples of a beautifully decorated family home. Perhaps it's no surprise that the couple works in creative fields. I'm sure Kerryn's expertise as the former South African editor of ELLE Decor came in handy during the remodeling and decorating phases.


As you may remember, I usually gravitate towards rooms with lots of color, but this home shows us how a simple palette allows an eclectic assortment of belongings to shine. The bright kitchen above looks like a great place to work in while the kids run around (though not near the stove! ... as I tell my children).


Again, the simple elements of the entry above are put together in such a way that it creates a cozy and welcoming entry, someplace where I imagine you could come home and kick your shoes off while perusing the mail.


I could really go on and on about how this home had me practically taking out my magnifying glass as I admired everything in it.


I don't know whether the dark gray walls in the bedroom above had wallpaper on them or simply chalkboard that had been painted over in a pattern. Either way, it gives me a great idea for something new to do with the chalkboard wall in my kitchen. This magazine spread is brimming with so many great ideas for a family home that it's going right at the top of my inspiration file on family homes.

Don't you just love it when you come across a home that completely mirrors what you're trying to achieve in your own home?


Photobucket

Turning a Pottery Barn table runner into a valance

Always hard-pressed to turn down a bargain, I recently scooped up two table runners on discount at Pottery Barn and converted them into valances to help brighten my kitchen.

Going from red-tone to white-and-yellow valances has done a great deal to lighten the look in my kitchen.


When you have children, you learn to make certain sacrifices in your decor. For me, that meant no white kitchen cabinets. I had always dreamed of having an all-white kitchen flooded with light, but white cabinets seemed like asking for trouble with little ones around to use them as canvas for "artwork."

Though obviously not life-shattering, the decision to choose dark cabinets has come to haunt me in the six years since we first moved into our home. I now realize how other design decisions I made, including brown-tone granite counters and dark distressed hardwood flooring, have all combined to create a somewhat somber kitchen, the total opposite of what I wanted.


In an attempt to inject lively touches into my kitchen, I then added red. Too much red, as you can see in the photo above. After six years of so much red, I'm ready to mix it up to make the room more interesting.


I spied white-and-yellow Pottery Barn runners at my local outlet store for $10 each and couldn't pass them up even though I had no specific project in mind and no need for additional table runners (though I did like how it looked in the photo above). I fell in love with the print on the cotton fabric, a reproduction of patterns on fabric embroidered by hand by the Otomi Indians in Mexico (click here to see an example).


After bringing them home, I discovered that the runners, measuring 18-by-108-inches, were the perfect length for the two large windows in my kitchen. Because they were lined, the only alteration needed was some simple stitching down the length of each runner, to create an opening for the curtain rod. I was uncertain that my plans were doable, so I called on my mom for sewing help and she whipped up the valances in just a few minutes. Three cheers for moms!


One day, I will get those white cabinets, but for now I am thrilled with the results of this simple project. I have other easy changes I plan to make, including a new rug, and other small touches.

By the way, I'm always in awe of what a few simple stitches can accomplish, though I have to confess to usually enlisting my mom for help with this. Here are is a pillow cover she recently sewed for me after finding the embroidered textile at a thrift store. Knowing how much I love folk art, my mom bought the fabric and sewed it into a pillow, complete with a button enclosure on the back. Here it is in my living room:


And up close:


Frankly, I prefer simple projects that I (or my mom!) can do in less than an hour. It's about all the free time I have now that I have two little ones, who by the way turned out not to favor walls so much for their writings. OK, only once!

Let me know if you have any ideas for my kitchen. I'd love to hear them.

Photobucket

My Mexican-inspired take on Martha Stewart pom-pom tissue flowers

In honor of the Cinco de Mayo holiday, I'd like to tell you about a project my kids did after attending a piñata-making workshop with a local artisan. Piñatas, usually filled with candy and small toys, are intended for kids to hit with a stick until the piñatas break open and spill the goodies, but I instead decided to hang two tiny piñatas my kids made as decorations for my home office.


Like many of you, I enjoy crafting with my kids, even more so when the craft is something we can use to decorate our home. The craft then becomes a reminder of fun time spent together, while also adding more character and beauty to our home.


The tiny piñatas, which I'm calling my Mexican-inspired take on the Martha Stewart tissue pom-pom flowers, nicely complement a lantern I bought at Chinatown recently and add a nice pop of color to what is perhaps the blandest corner of my home office.

At this point, I should come clean and confess that this project, which is really quite simple, took us several months to complete. We created the newspaper shell soon after going to the piñata-making workshop in February 2010, decorated the piñata in May 2010 and then I let the piñata sit in my office unhung for a whole year! In a burst of inspiration, I hung them up yesterday. My poor kids didn't remember the little balls were piñatas and instead called them "balloons," but were thrilled that I finally hung up their creations.

Here's how you can make your own tiny piñata:

Step 1: Blow up a balloon. Make a homemade paste using about 1/2 cup of flour mixed with about a cup of water.

Step 2: Using a small, thick paintbrush, begin gluing torn strips of paper onto the balloon.

Step 3: Cover the balloon completely except for a small hole at the top that will help you hang it or that you can use to fill up the piñata later. To make sure you've pasted enough newspaper to the balloon, hold the balloon up to the light to make sure you can't see the balloon. The more layers, the stronger the piñata will be.


Step 4: Wait two days or so for the piñata to dry completely. If you are planning to use this for an actual piñata that will be smashed open by kids, you will want to repeat the process of adding more newspaper strips to make it stronger. Otherwise, pop the balloon while holding a piece of it so you can pull it out through the hole.


Step 5: Begin decorating the newspaper ball with tissue paper or any other decor of your choosing. We used tissue paper we had cut up using a circle punch, but the traditional method is to use strips of tissue as I showed you in this post.


You may wish to add more tissue paper to completely cover the newspaper, though my kids were satisfied with doing just one layer. Here are the finished piñatas, hanging in back of my desk in my home office. (Please disregard the messy desk.)


The most time-consuming part is waiting for the newspaper to dry after you've glued it on, but as you can see, the project is simple enough for kids as young as two and four years old, which is how old my kids were when they made these piñatas. It really made me so happy to do this project with my kids since I remember making my own piñatas as a girl though not for Cinco de Mayo. It may surprise you to know that, for all the hype in the United States every May 5, most people in Mexico don't celebrate the holiday at all. You can read a story about this phenomenon that the Christian Science Monitor published today here.

Nevertheless, I think making piñatas is a great project for kids any time of the year, either for a party or for decoration. The piñata can be as simple as a tiny ball like the one we made or as elaborate as your imagination wants it to be.

Photobucket

Is it OK to deface books in the name of art ... or to make a wreath?

Decorating with books is all the rage these days. Every retailer from Pottery Barn to 1stdibs sells old (or made-to-look-old) tomes for people to display in their homes. Crafty types have been busy creating wreaths, paper flowers and other pretty paper wares that are tempting me to do something I was taught never to do: destroy a book.


When it comes to crafting with paper, I'm eager to dig into my piles of pretty paper in search of the right one for the project at hand. But if the project calls for using the pages of a book, I've yet to muster up the courage to tear out pages of a book or even bend them.

Last winter, I set my sights on making a wreath made with the pages of a book after being inspired by tutorials I saw on various blogs. Among my favorites was a sweet burlap-backed wreath made using the pages of a "Little Women" book (featured on Redberry Barn blog) and a simple but pretty paper wreath with a detailed video how-to on a post titled, "Librarians, Please Avert Your Eyes" on the Living With Lindsey blog.

I rushed right over to a thrift store, where I took more time picking out a book to rip up than I would usually spend choosing a book to read. I ended up choosing two old romance novels that are now sitting untarnished (and unread) on a bookshelf, largely forgotten until I came across another book-altering (or is it destroying?) project.


More than 50 people weighed in on a post on Apartment Therapy that explained the best way to carve a hole in a book that would serve as a planter. Many commenters lamented the book-cutting but plenty others defended the project as a worthwhile way to repurpose a book that would otherwise remain unread and unused. Being the obsessive type that I am, I began researching or rather Googling "book art" and came across the most wonderful creations.


I suddenly found myself wavering on the whole issue of keeping books intact. Mesmerized, I scrolled through the portfolio pages of London artist Su Blackwell and read through her blog, where she just posted a video detailing the creative process behind a sculpture she created using pages from a book.

Her work is beautiful and evocative, and I further admired her creations upon reading on her website that she reads at least once or twice the book she is using to create her sculptures. Is it OK then to cut up a book in the name of art? And, if so, who is to say that the most beautiful wreath out there is not comparable to an intricate paper sculpture?

Certainly not me. For now, I've decided to leave the romance novels untouched, but I'm not getting rid of them just yet. And it's not because I'm ever planning to read them.

Photobucket